Weber Progressive Carb Installation Guide
Ditching the stock Solex for a Weber Progressive 32/36 DGEV was the best performance upgrade I made to Jenny. Here's exactly how to install it, tune it, and what difference it actually makes.
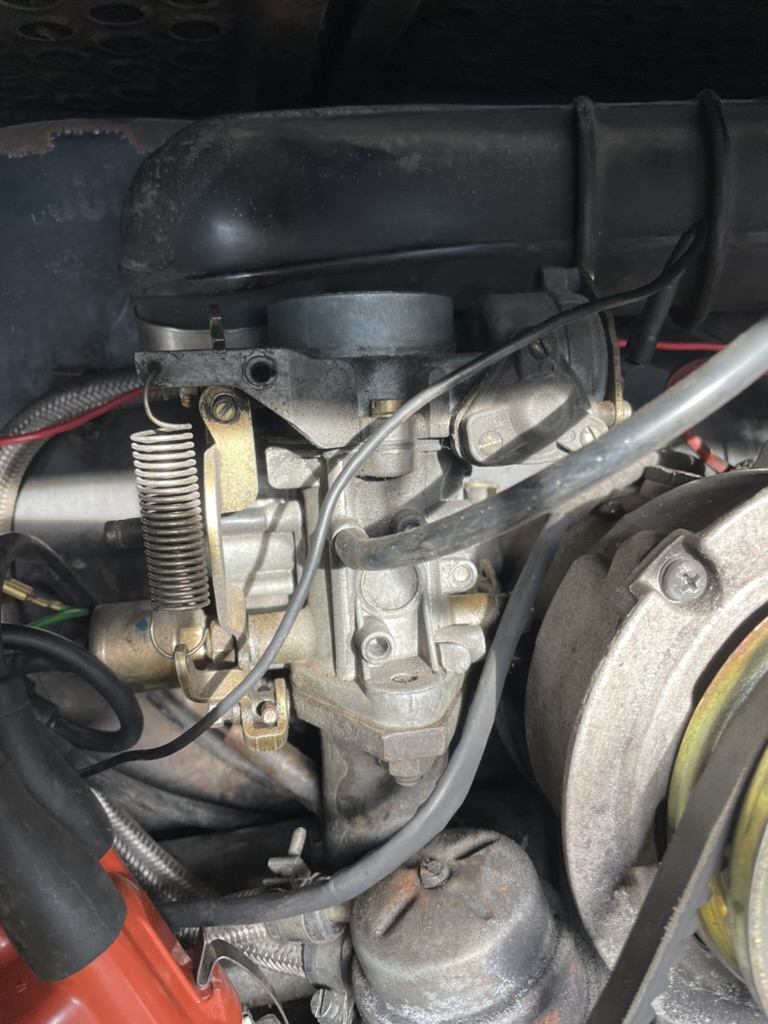
The trusty old Solex 34 PICT carburetor with the original oil bath air filter — it worked, but I wanted better.
Why Upgrade from the Stock Carb?
Let me be honest upfront: there was nothing actually wrong with Jenny's original Solex 34 PICT carburetor. It ran. It started (mostly). It did its job.
But here's the thing — it comes down to personal preference. There's a fair bit of good and bad press out there for the Weber Progressive carb. Some people swear by the original Solex, others are Weber converts. I decided to try it for myself.
And I have to say: so far I love it. It runs beautifully and better than the original for me. But I'm getting ahead of myself — let me show you the whole process.
Step 1: Label the Old Carb
Before removing anything, I labelled everything on the old carb. As a novice, I needed to remember where everything connects — fuel line, vacuum lines, linkages, all of it.
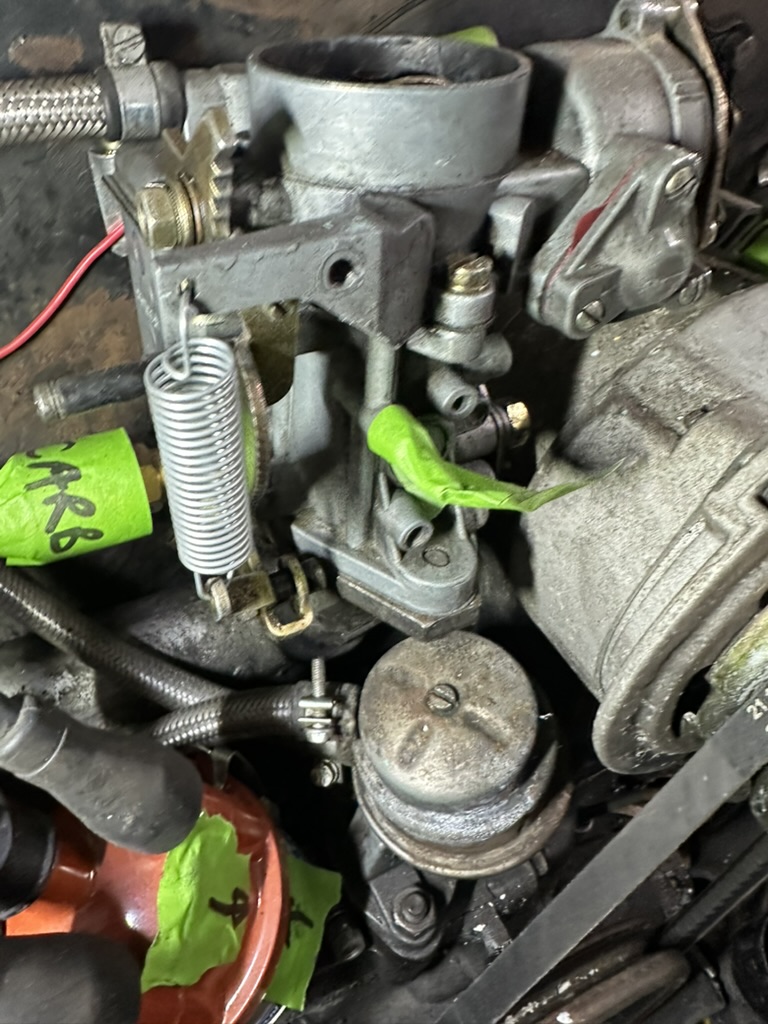
The old carb labelled — helping this novice remember where everything connects.
Take photos. Use masking tape and a marker →. Write down which hose goes where. This saves hours of confusion later when you're trying to connect the new carb.
Step 2: The Heat Risers Problem
When I removed the old carb, I discovered the heat risers → were completely rusted through. They needed urgent replacement anyway, so this was perfect timing.
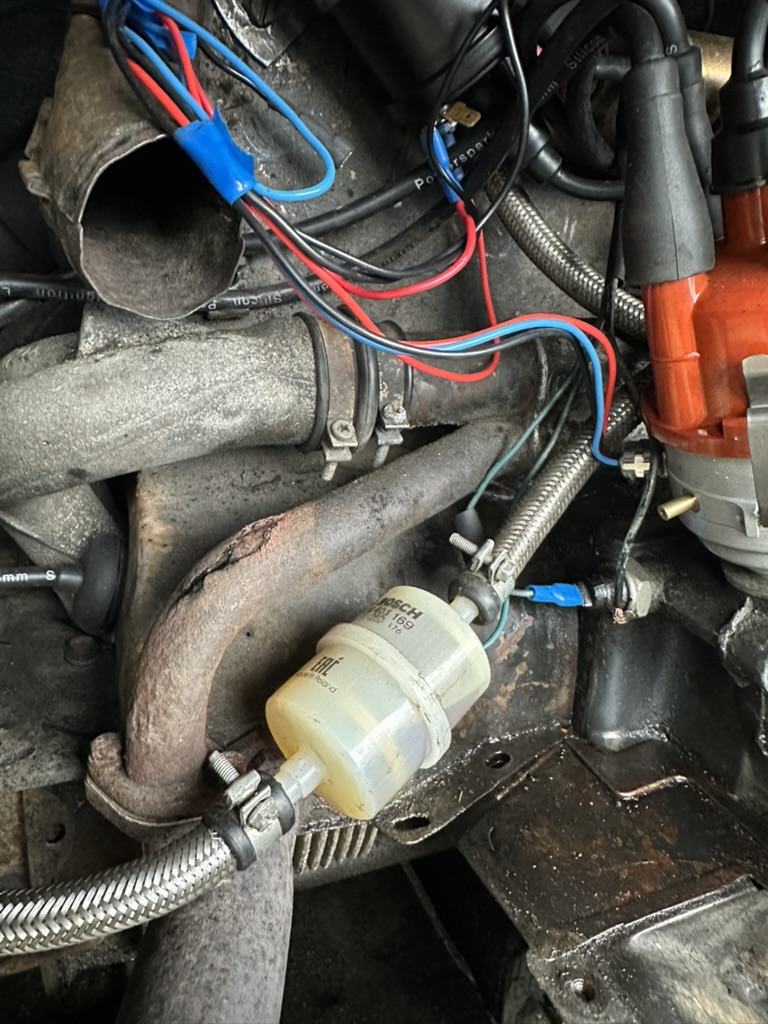
Split heater risers — completely rusted through and needed urgent replacement.
This is common on older Bay Windows. The heat risers sit right where moisture collects, and decades of heating and cooling cycles take their toll. Mine were barely holding together.
Which Weber Carb to Buy
For a stock 1600cc Bay Window engine (1971–1979), the Weber 32/36 Progressive Carb Kit → is what you need. This kit features a 356 aluminium manifold with open plenum for improved throttle response, plus uni-link throttle linkage for smooth, precise control. It's pre-jetted for engines up to 1835cc — perfect for your 1600.
Everything You Need — Shop Now
1️⃣ Weber 32/36 Progressive Carb Kit
Twin-port, pre-jetted for 1600–1835cc. Includes manifold & uni-link linkage.
⚠️ 2️⃣ Malpassi Filter King Fuel Pressure Regulator
CRITICAL: 2.5–3 PSI. This single part prevents 90% of Weber problems.
Supporting Essentials
Affiliate links — we earn a small commission at no extra cost to you
🚨 FUEL PRESSURE: Non-Negotiable
Air-cooled VW engines pump 5–7 PSI. Weber carbs max out at 2.5–3 PSI. Get this wrong, and your engine floods, won't start, runs rich, and fouls plugs. This is THE #1 reason people fail with Weber carbs.
Essential: Malpassi Filter King Fuel Pressure Regulator
Mount this as close to the carb as possible. Return line back to tank. Adjust to 2.5–3 PSI. Game-changer.
Also grab: inline fuel pressure gauge → to verify your pressure settings (£12–18).
Cost: About £700 for the complete kit plus regulator and tools. Worth every penny.
Installation Process
Step 1: New Heat Risers and Inlet Manifolds
Since the old heat risers were rusted through, I fitted brand new heat risers → along with fresh inlet manifolds →. This gives you a clean foundation for the Weber.
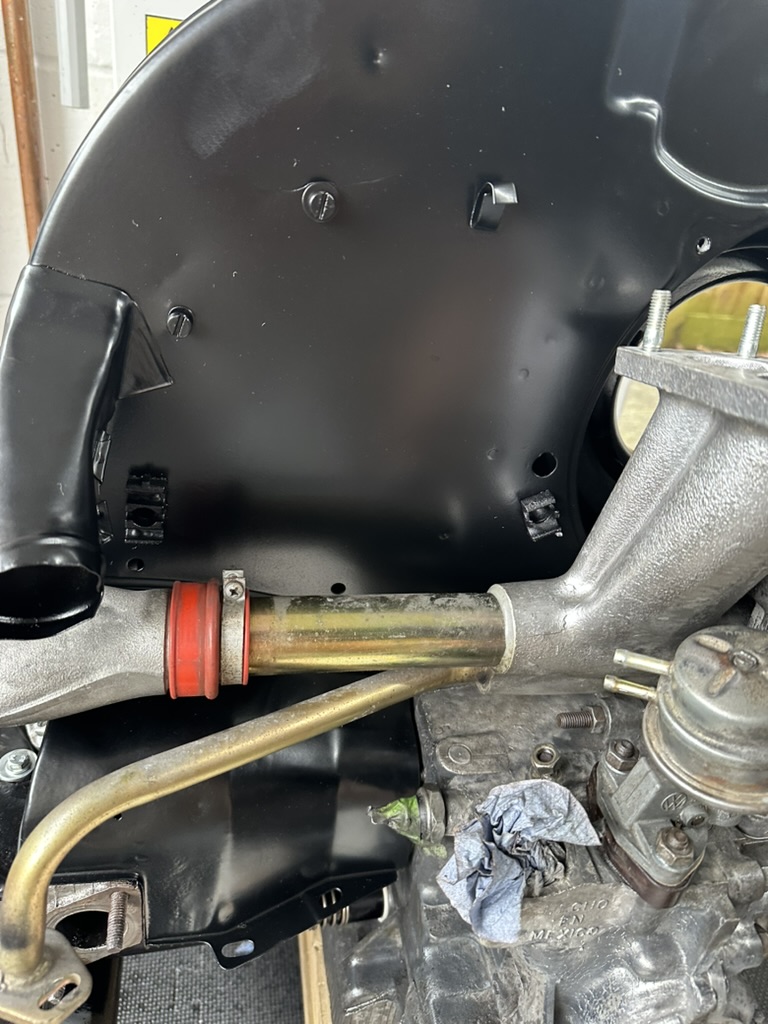
Shiny new heat risers and inlet manifolds — a proper foundation for the Weber.
Step 2: Fit the New Manifold
The Weber uses a different manifold than the Solex. Clean the mounting surface on the inlet ports — needs to be spotless. Install new gasket, bolt on the new manifold.
Step 3: Install the Weber
Mount the Weber 32/36 DGEV → to the new manifold with the supplied gasket. Make sure it sits flat — any gaps will create vacuum leaks.
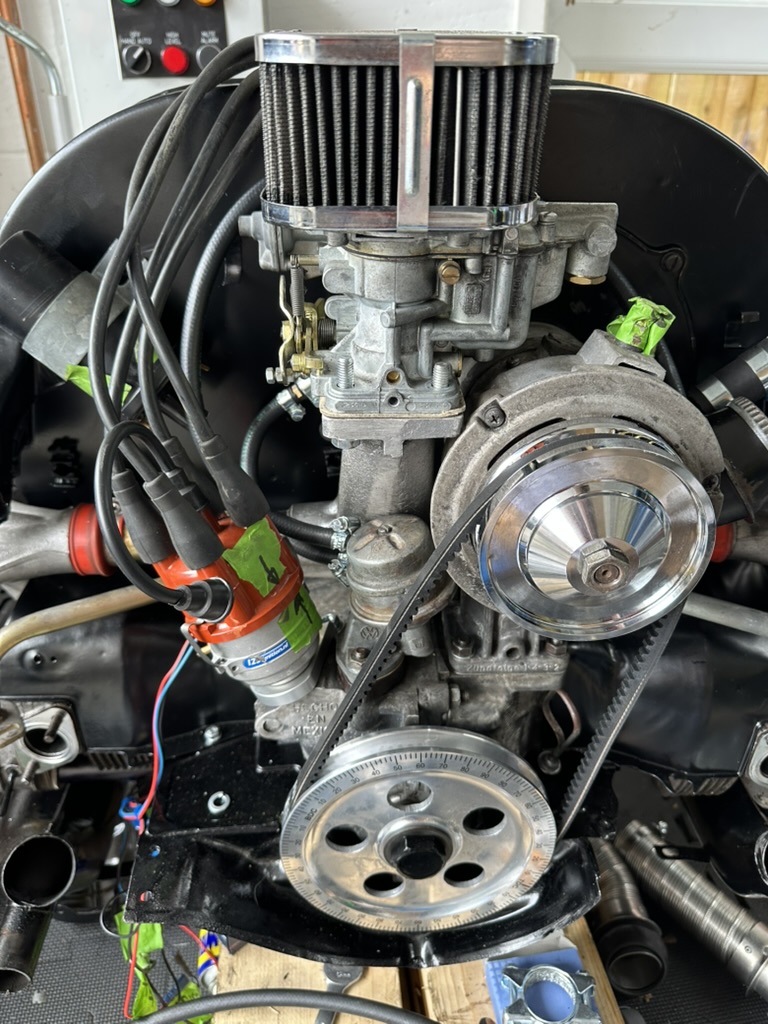
Brand new 32/36 Weber carb now fitted with pancake air filter.
Step 4: The Accelerator Cable Challenge
Here's where it gets a bit fiddly: getting the accelerator cable attached and running smoothly. The Weber kit comes with linkages, but making it all work smoothly takes patience.
There are various linkage kits → available that make this easier. The key is making sure the accelerator cable runs through its housing smoothly — use plenty of lubricant →.
Pro Tip: Be Patient With The Cable
Don't rush this bit. The cable needs to operate smoothly through its full range without binding or sticking. Test it repeatedly before you button everything up. A sticky throttle cable is dangerous.
Step 5: The Air Filter Situation
I do love how the Weber runs, but I also love the way it looks. I'm sure the old oil bath air filter is better for filtration, but for me this pancake filter setup works just as well.
Initially, I fitted the air filter that came with the kit. But when the engine went back in, I discovered there was limited room — the new carb kit sits quite high in the engine bay.
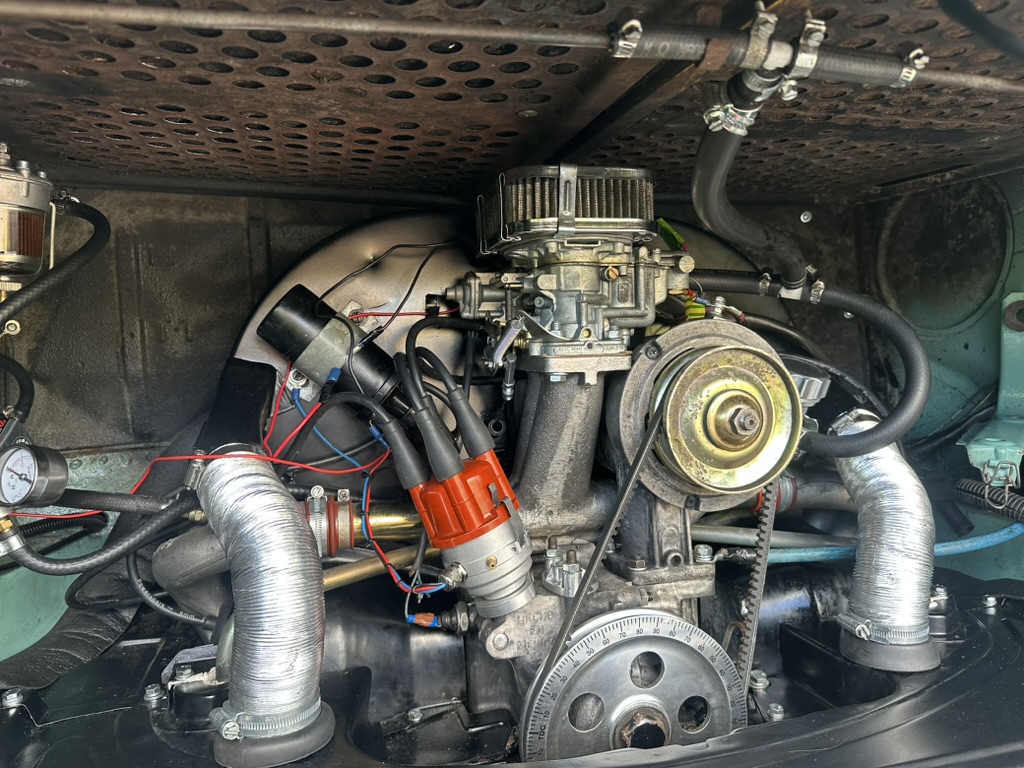
Super slim pancake air filter now fitted — needed because the original kit filter was too tall for the engine bay!
So I replaced it with this super slim pancake air filter →. It was a last-minute addition, but absolutely necessary to get the engine lid to close properly. The slimmer filter still provides good filtration while fitting in the tight space.
Initial Tuning - The Fiddly Bits
The Weber comes pre-jetted for a stock 1600cc engine, which means it should run reasonably well straight out of the box. But there's a catch: the adjustment screws are at the rear of the carb, very close to the fan housing.
This makes tuning... let's say "character building." You'll need patience and possibly some stubby screwdrivers →. It's doable, just fiddly.
Idle Speed
Warm the engine up fully. Set idle to about 850–900 rpm using the idle speed screw (the one you can actually reach). Doesn't need to be perfect initially — you can fine-tune later once you've driven it a bit.
Idle Mixture
This is the tricky one because of the screw position. Here's the process:
- Engine at full operating temperature
- Start with mixture screw 2.5 turns out from fully seated
- Slowly turn clockwise (leaner) until engine starts to stumble
- Back it out (richer) until it stumbles again
- Set it halfway between those two points
- Adjust idle speed if needed
Pro tip: Have a friend help if possible. One person working the screwdriver, another watching the engine and listening. Makes the awkward access much easier to deal with.
Choke Setup
With engine cold, pull the choke. The choke plate should close fully. When engine is warm and you push the choke in, it should open completely. Adjust the cable if needed.
The Honest Assessment
The Good:
- Runs beautifully — Better than the original Solex for me
- Immediate throttle response — No more flat spots
- Pulls much stronger in mid-range — Where you actually need it
- Starts first time, hot or cold — Reliable starting
- Rock-solid idle — No more hunting around
- Looks fantastic — The aesthetic upgrade is real
The Fiddly Bits:
- Adjustment screw access — At the rear, close to fan housing, awkward to reach
- Accelerator cable setup — Takes patience to get running smoothly
- Air filter height — The kit filter was too tall, needed super slim replacement
- Not plug-and-play — Requires proper setup and tuning
My Verdict:
Despite the fiddly installation and adjustment challenges, I absolutely love it. The performance improvement is noticeable every time I drive. The mid-range pull is so much better — overtaking, pulling away from roundabouts, climbing hills — everything feels more confident.
And honestly? I love the way it looks too. The clean, simple pancake air filter setup has a classic performance vibe that suits Jenny perfectly. The old oil bath filter might filter marginally better, but this setup works brilliantly and looks the part.
Common Issues & Solutions
Issue: Engine Won't Idle
Solution: Check for vacuum leaks. Spray carb cleaner around gaskets and connections while engine is running. If idle changes, you've found your leak. Tighten or replace gaskets.
Issue: Flat Spot When Accelerating
Solution: Accelerator pump adjustment. There's a small screw that controls how much fuel the pump delivers. Start with one full turn clockwise from factory setting.
Issue: Poor Fuel Economy
Solution: Mixture is probably too rich. Lean out the idle mixture slightly (turn screw clockwise in small increments).
Advanced Tuning (If You Want)
The Weber is jetted for a stock engine, but if you've made other mods (exhaust, heads, bigger engine), you might want to change jets. This gets technical fast — I'd recommend getting it on a rolling road for proper tuning if you go this route.
For a stock 1600cc? The factory jetting is spot on.
Is It Worth £700?
For me? Absolutely. But let me be clear: this is personal preference, not necessity.
The kit — carb, manifold, regulator, tools — comes to around £700 all in.
The stock Solex works fine. If yours is running well, you don't need to change it. The Weber isn't "better" in some objective sense — it's just different, and happens to be the difference I prefer.
That said, the performance improvement is real. The transformation in drivability is noticeable. And once you've got through the fiddly installation and adjustment phase, it's reliable and consistent.
Just be aware of what you're getting into: awkward screw access for tuning, some cable linkage challenges, and potential air filter height issues. These aren't deal-breakers, but they're real considerations.
If you're comfortable with a bit of fiddly work and want better throttle response and mid-range pull, the Weber Progressive is a solid upgrade. Just don't expect it to be plug-and-play — it requires proper installation and tuning to work at its best.
📋 Complete Parts List — Ready to Order?
eBay (Best for carb kit & fuel parts):
- Weber 32/36 Carb Kit → — £250–300
- Fuel Pressure Regulator → — £80–120
- Fuel Pressure Gauge → — £12–18
- Gasket Set → — £15–25
Amazon UK (Best for tools & accessories):
- Stubby Screwdriver Set → — £12–20
- Mini Ratchet Set → — £18–30
- Jubilee Clips → — £8–12
- LED Magnetic Torch → — £15–25
- Slim Pancake Air Filter → — £20–35
Total investment: Around £700 for the complete kit, tools, and setup. Every single penny is worth it.
Final Thoughts
Six months on, I'm still happy with the Weber. It runs beautifully, starts reliably, and makes Jenny more enjoyable to drive. The fiddly installation was worth the end result.
Would I do it again? Yes. Would I recommend it to everyone? No — only if you're after better performance and are comfortable with hands-on tuning. If your Solex works well and you're happy with it, there's no pressing need to change.
But if you're curious about the Weber and willing to put in the work to set it up properly, I think you'll love how it transforms the driving experience.
Questions about Weber carbs or Bay Window upgrades? Drop me a message on Instagram @jennythebus!
More VW Upgrade Guides
Get practical restoration tips delivered to your inbox.